Showing posts with label crafts. Show all posts

Thursday, April 21, 2011

Curtain Playhouse

Are any other moms out there ready for these spring rains, that do bring beautiful spring flowers, to pack up and move on? We're getting some cabin fever over here and looking for any way to entertain. One of my favorite rainy day secret weapons is a playhouse front I made out of some curtains.

I discovered some old curtains that I had from who knows where and decided to sew the two pieces together to make one big piece. I cut out a door and windows and lined them with ribbon. I think this is about the time that I completely gave up the sewing part and pulled out a hot glue gun. Then, the mailbox was added from some scrap fabric I had, a felt planter with some felt and pipe cleaner flowers were stuck in, and a doorbell from felt. A cute roof was added with fabric. I made curtains later (on one side because I procrastinate) and a little ribbon table with a felt cup and cupcake. It's such an easy project and I love that you can fold (or just wad it up) and throw it in a closet before company comes over. We slipped a shower curtain through the top and put it in the hallway in front of her room, or as you leave the living room, or wherever. Who doesn't love an automatic playhouse?! And because pretty much everything was done with a hot glue gun (and all of it could have been), anyone can do this project!

Hope this saves some of you on some rainy days!


Easter baskets :)


Easter is coming up (April 24th) and with that comes the search for an Easter basket. I decided this year that I would sort of cheat, and instead of buying one of the normal baskets that you either throw away or stick in some closet to use a couple of years or just end up throwing away in the end anyway, I bought a metal one. I got it for $4 at Hobby Lobby (it was half off on a sale day), and I got one for Story (that I haven't worked on yet) at the Salvation Army thrift store for $1! Not bad, right? With London's, it was already painted pink, which was a big help, but I got some ribbon that was on sale to use as well. I pulled out my hot glue gun and got to work. I first took some scrap fabric that I liked in pink to glue on the middle area (knowing I had the same material in purple to use on Story's) and then covered up the rest, as well as some mistakes, with the ribbon. I loved how it turned out, but then decided to add some ribbon wrapped around the handle and a matching bow tied on it for some more cuteness. The result? A seriously cute Easter basket for $5.50ish!

Here's my favorite part, on tin/metal, hot glue peels off! Which means, after Easter (or I'm tired of it) I'll peel off all the decorations and add new to either match their room and use the pail for something in there, or another Easter basket! AND, I'll just take that bow off and hot glue it to a clip, and TADA! London has a new bow. I love love love when things can be used again and not just wasted, and I have a feeling you do too. ;)

I just finished Story's too, so I can go out and buy that edible grass for them (it's the only safe way to go in this house) and fill them up! I mean...so the Easter bunny can fill them up!


Entertainment Center turned Kitchen Set

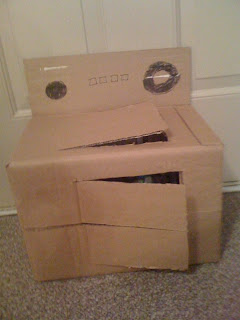
I thought I'd share our version of the entertainment center turned kitchen set. She's been playing with it so much lately with the rain and loves it just as much as when she first got it! There are ideas online all over using an entertainment center, so we looked at several and tweaked our own until it was just right. We bought the entertainment center on Craigslist.com for $35 and already had a lot of the paint.

Our first job was to go and find the pieces we needed, such as the sink and oven/stove knobs. We got the faucet for $10 at the Surplus Warehouse store over on Caraway, and next went to Home Depot. They were so awesome and when we explained our project, they went all over the store looking for things to help us. We eventually ended up in the very back with the appliances that are being trashed, and the manager spent a crazy amount of time prying off an oven handle for our fridge door and gave us some knobs off an oven. Free!

Next, Lance built up the sink area and cut a hole. He painted the entire kitchen white, except for inside one cabinet (the oven) which he painted black. We slipped a metal mixing bowl that we already had down into it for the sink and glued the rim down all the way around. He put on the doors he had painted, and flipped the oven so it'd open down. (Side note, if you make this and make the oven so that it does open in the direction a normal oven opens, add a small chain from the door to the inside of the oven so that it catches. Otherwise, it drops and hits little feet)

The stove is simply a piece of wood painted white with black circles and glued on. The only other thing to do after all that was fill it up! I did spray paint a small square piece of wood with chalkboard paint and stapled ribbon on for a handle to hang at the end of the kitchen with her apron. We also added a few screw in hooks to hang up dishes and her oven mit.

It was sitting there all ready to go Christmas morning, and as soon as she saw it, she ran to it and immediately started doing dishes! Doing dishes? Where'd she get that? I would totally understand if she ran straight to it to put on a pot of coffee. ;)

All in all, Lance worked on this kitchen 10ish hours (most of that was trying to figure out how to do the next part without a guide) and we spent around $60. Less money than the neat plastic ones we liked so much and this one turned out SO much better!


Wednesday, April 6, 2011

Magnetic Chalkboard

So, I'm still obsessed with spray paints of all sorts, particulary gray, chalkboard, and magnetic (yes! for those thinking, there's magnetic spray paint?). A project I did a few weeks ago mixed all of those together! I'm afraid I don't have any before pics...it was really just an ugly framed home decor painting. I think it was a barn...or a house or something. I remember it had a really light color wood frame and a HUGE maroon matte, the picture itself was like a 5X7 haha. So, I took the glass and picture out of the frame and sprayed the frame gray. Then, I sprayed the glass with the magnetic spray with 3 or 4 coatings. Next, I sprayed it with chalkboard spray with two coatings. Once it was dry, I "seasoned" the board by lightly coloring the whole thing with chalk and erasing it, then put it in the frame. It looked a little boring, PLUS, some horrible wind, mingled with the sprayer thing on the magnetic paint made some really bad places on the top middle of the board. sooo, I made some fabric flowers to cover up my mess and hot glued them over it :). They'll never know. Also, you could do one side with this idea, and the other side of the glass with the mirror spray (and yes! there's mirror spray lol). Then, if you wanted to go with an elegant look, you could switch it to the mirror, and switch it back with your decorating mood. :)

Wednesday, March 16, 2011

Girls' Room- glue gun crazy

I've recently decided that gray spray paint is on my top 10 list of absolute FAVORITE things ever. I love the color gray anyway, so when I can change something from blah or very average to sophisticated and cute with a little spray, I'm definitely going to do it! Here are a few things I've done in the last couple of days using an old shirt that wasn't maternity, but is the style that makes you look pregnant anyway....and who wants to look pregnant when you aren't? (especially if you've just spent 20 months out of the last 3 years pregnant :))


Said shirt. I took a sleeve off before I remembered to take a pic.


I drew a bird shape on a paper towel and then traced it onto the material. sewed together and stuffed.


the mobile with pretty flowers and the birds and a little butterfly perching on the branch :)


The pink shelf painted with a flower added. (don't mind the mobile I didn't move out of the way for a photo :/)

The ugly lamp


Lamp redone. I could never get the lighting good enough to really show how cute it is

Monday, March 14, 2011

The girls' room- Ceiling clouds

Sometime in the near future, we plan on switching the girls' room with the office. It's a bigger room and has two closets. Of course, when I say we, I mean me. Lance is more the manual labor behind my bright ideas, and honestly, the way I work usually stresses him out :).
The theme for the girls' new room will be a nature one, which means Lance's current beige office will have to be painted, and....London's currently EXTREMELY pink room needs to be painted as well. (For some reason, Lance isn't into the three shades of pink for his guitars and desk?)

Though nothing has really been started because I've been waiting until my spring break, I did have to start the ceiling decorations because the cardboard was going to get wet outside and was too huge to keep inside.
I took a long piece and cut out three clouds and nine raindrops. I spray painted the clouds a pretty blue and then dry brushed white on it to give it texture. The raindrops were painted a lighter blue. Then I looped fishing line through the drops and tied it and then used a needle to pierce it through the clouds and taped it on the top. we nailed them up, but if the ceiling wasn't that popcorn texture, thumb tacks wedged into the curves of the clouds would have worked.


So cute and really easy. I got the idea from the clouds around the light fixtures at the Memphis Children's Museum and decided to add further cuteness with the rain. Now I have to decide on a cute sun idea, since my friend Casey says it'd be depressing to make my kids live in rain nonstop without a sun. haha


I got the cardboard from the boxes our swing set came in


Wednesday, March 2, 2011

Kid's church bag


Hello all. I've decided to stop saying my life has been crazy lately, b/c it has yet to stop being crazy at all. But I've slowly grown to love that about it ;). Recently, I've been using a felt purse I made London just to play with as her church bag. It's perfect because I can hold a few diapers and her cup of water for class, without being huge. I love that it fits inside my purse or Story's diaper bag and she can carry it if she wants.


I used 3 and a half pieces of pink sparkly felt (who do you think picked that out?) and just sewed them together, glued a few hearts I cut out on and sewed some ribbon on for a handle and there ya go! Mostly, I wanted to sew felt to practice on my machine (that still intimidates me) b/c felt doesn't fight back like other fabrics. So I decided this past Sunday that Story needed a bag like this and then I may actually be able to put both inside my purse and pull them out for the nursery workers and in the end, actually carry a PURSE (like a normal woman!) to church! So I went to my felt collection last night to start! Unfortunately, I was all out of girly colors so it was brown or green. Also, recently, I've bypassed all sewing by using a hot glue gun, and I completely recommend that. :) Small projects I have time for, learning a new skill? Not so much. So, I hot glued some green felt together and looked around for a way to make it less boyish. I saw some pretty pink material I had bought last summer and glued it on the flap part. I also cut out petals to make flowers out of the material and the ribbon I used for the handle. annnddd tada! cute little tote for a redheaded Irish lassie, in about...30 minutes or less.


Tuesday, February 22, 2011

so many projects...

Is it just me or has the last two weeks been insane for everyone? London turns 2 Thursday (which is just insane in its own right), and the party is Saturday...which means things have to be finished for it tomorrow or Friday, since Thursday we'll be busy celebrating. The praying specifically for my husband thing has fallen at a very challenging time, but it's been a learning experience in making prayer a priority with a very very crazy life going on. I had big plans today that I would get so much accomplished before bedtime and maybe get to bed early! fail. I spent the morning removing all the pictures of my girls from facebook (a long story, but something I've been going back and forth on for months now.) Then ran errands with London, and then got home and didn't start on "projects" until late afternoon. Unfortunately for my procrastination, London has realized things she wants can be made for the most part, and I enjoy challenges. Not even halfway into working on her birthday banner, she requests a dryer for her dirty clothes. Not a lot of time, so all she got was this.


it was full of dirty clothes immediately, of course, and I hope she practices and can graduate to a real one soon. ;) finally, I started and finished the banner for London's party, and yes, it is up on my wall already b/c I'm afraid of little hands and the tearing of tulle.


future note, if someone makes this in the future...buy pink polk-a-dot paper...the painting step makes too many steps

the really ridiculous part is the list of projects I want to do that keeps building in my head....easter baskets anyone?